Configuring HTTP Proxy Servers
The HTTP Proxy Servers table lets you configure up to
The following procedure describes how to configure HTTP Proxy Servers through the Web interface. You can also configure it through ini file [HTTPServer] or CLI (configure network > http-proxy > http-server).
| ➢ | To configure an HTTP Proxy Server: |
| 1. | Enable the HTTP Proxy application, as described in Enabling the HTTP Proxy Application. |
| 2. | Open the HTTP Proxy Server table (Setup menu > IP Network tab > HTTP Proxy folder > HTTP Proxy Servers). |
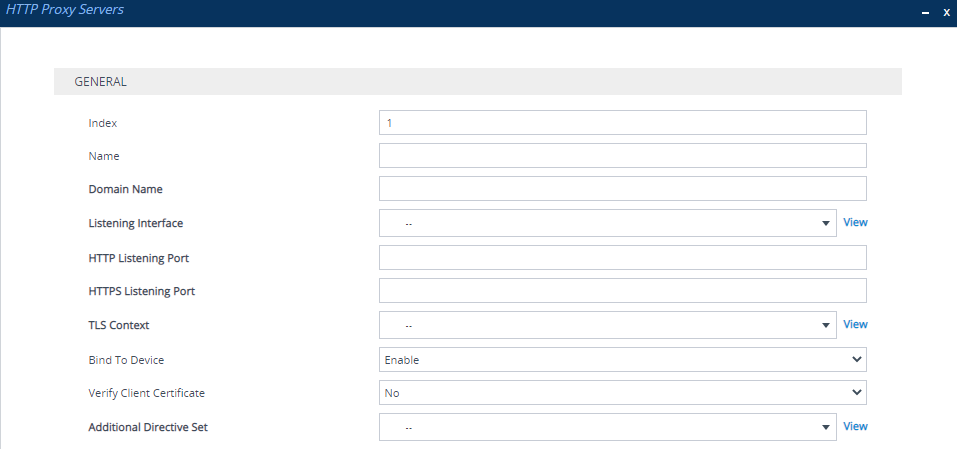
| 3. | Click New; the following dialog box appears: |

| 4. | Configure an HTTP Proxy server according to the parameters described in the table below. |
| 5. | Click Apply, and then save your settings to flash memory. |
HTTP Proxy Servers Table Parameter Descriptions
|
Parameter |
Description |
|||||||||
|---|---|---|---|---|---|---|---|---|---|---|
|
'Index' [Index] |
Defines an index number for the new table row. Note:
|
|||||||||
|
'Name' name [ServiceName] |
Defines a descriptive name, which is used when associating the row in other tables. The valid value is a string of up to 40 characters. By default, no value is defined. Note:
|
|||||||||
|
'Domain Name' domain-name [DomainName] |
Defines a domain name (FQDN). This is configured only when multiple DNS domains share the same IP address. Note: The NGINX directive for this parameter is "server_name". |
|||||||||
|
'Listening Interface' listening-int [ListeningInterface] |
Assigns an IP Interface to the HTTP Proxy service. To configure IP Interfaces, see Configuring IP Network Interfaces. Note:
|
|||||||||
|
'HTTP Listening Port' http-port [HTTPListeningPort] |
Defines the HTTP listening port, which is the local port for incoming packets for the HTTP service. Note:
|
|||||||||
|
'HTTPS Listening Port' https-port [HTTPSListeningPort] |
Defines the HTTPS listening port, which is the local port for incoming packets for the HTTP service. Note:
|
|||||||||
|
'TLS Context' tls-context [TLSContext] |
Assigns a TLS Context (TLS configuration). This is required if you have specified an HTTPS listening port (see the 'HTTPS Listening Port' parameter above). To configure TLS Contexts, see Configuring TLS Certificate Contexts. Note: The NGINX directives for this parameter is "tls-context", "ssl_certificate", "ssl_certificate_key", "ssl_ciphers", "ssl_protocols", and "ssl_password_file". |
|||||||||
|
'Bind To Device' bind-to-device [BindToDevice] |
Enables the NGINX to bind the HTTP Proxy interface to a specific device network interface.
Note: The parameter forces responses to incoming HTTP requests to be routed back out the intended IP Interface. Prior to 7.4 versions which run on CentOS8, this was the default behavior. However, due to changes in the behavior of CentOS8, it's necessary to enable the parameter to ensure packets are sent through the intended IP Interface. If you configure multiple HTTP servers that share the same IP Interface and port numbers (distinguished by the 'Domain Name' parameter), the 'Bind To Device' parameter should be enabled for the first, and disabled for subsequent HTTP servers. |
|||||||||
|
'Verify Client Certificate' verify-client-cert [VerifyCertificate] |
Enables the verification of the client TLS certificate, where the client is the device or user that issues the HTTPS request.
Note: If you configure the parameter to No or Yes, it applies to all associated HTTP Locations. If you configure the parameter to Optional, client certificate verification is configured per HTTP Location in the HTTP Locations table. |
|||||||||
|
'Additional Directive Set' directive-set [AdditionalDirectiveSet] |
Assigns an NGINX Directive Set for the HTTP service. To configure HTTP Directive Sets, see Configuring HTTP Directive Sets. |